This Windows 10 tutorial will teach you how to stop automatic updates on your Windows 10 computer. This is a step by step guide for doing the same. If you follow this guide, then you can stop downloading & installing automatic updates on your Windows 10 PC/Laptop.

The auto-update on Windows 10 is really a headache. On earlier Windows versions, Microsoft provided an option to decide when to download and install the updates. But on Windows 10, you can’t find such an option. Means, we will suffer a massive speed drop in the internet connection whenever an update becomes available.
What’s the solution to this problem? The only official solution is to buy an Enterprise edition of Windows 10. You will get a default option to disable Windows updates. I know you are not going to do it. So, I am going to give you two different ways using which you can deactivate Windows 10 updates.
Stop Forced Windows 10 Updates From Downloading in Background
I have provided you with two ways to do it. You can follow any of them according to your convenience.
Using Services To Change Windows 10 Update Options
Step 1: Open Settings of your Windows 10 computer (a simple Start menu search will do the trick). Then, search for Administrative tools. Once you get, don’t forget to open the same.

Step 2: A New window will open, and you will see a bunch of tools there. All we need is Services. So, navigate to Services and double-click on the same to access it.

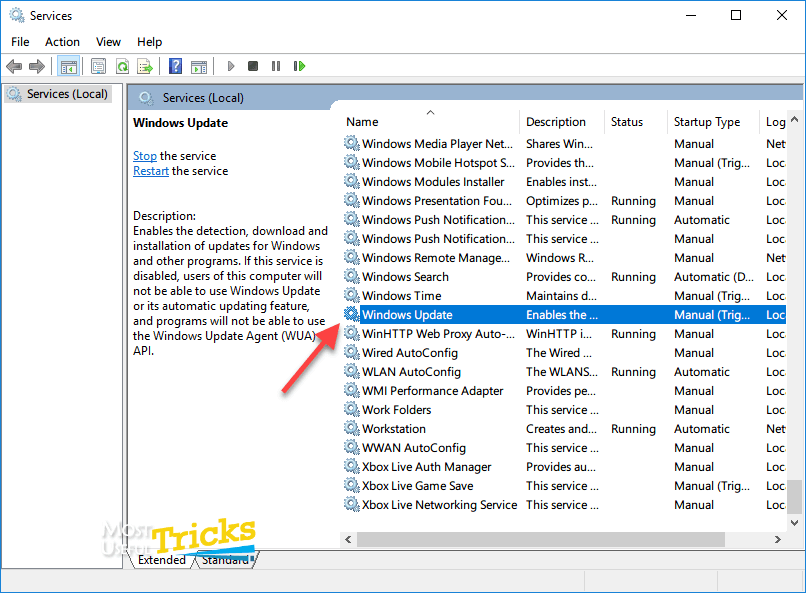
Step 3: Opening Services will reveal a new window with a ton of items on it. You need to search for Windows Updates and open it.

Step 4: What you see now is a small window with multiple tabs. Don’t worry! It’s not a complicated task as you won’t need to navigate to other tabs.

Just look at the drop-down menu given at right to Startup type. You should change it to Disabled. Finally, click Ok and, exit the Windows.
Hurray! You have just stopped Windows 10 automatic updates. N.B.- You don’t have to access Control Panel to open Services, though. Just hit the Start button and search for Services. That’s all. Alternatively, Win key+ R and services.msc would do the trick as well.
Read more on Brighter Guide:
- Gmail Alternatives: 7 Best Free Email Services to Use
- 10 Best Free Proxy Sites List for 2020
- 7 Paid Online Survey Websites for 2020
- How To Delete Gmail Account And Still Use Other Google Products
- Ubuntu 19.10 After Install: What to Do?
Using Group Policy Editor To Stop Windows 10 Updates
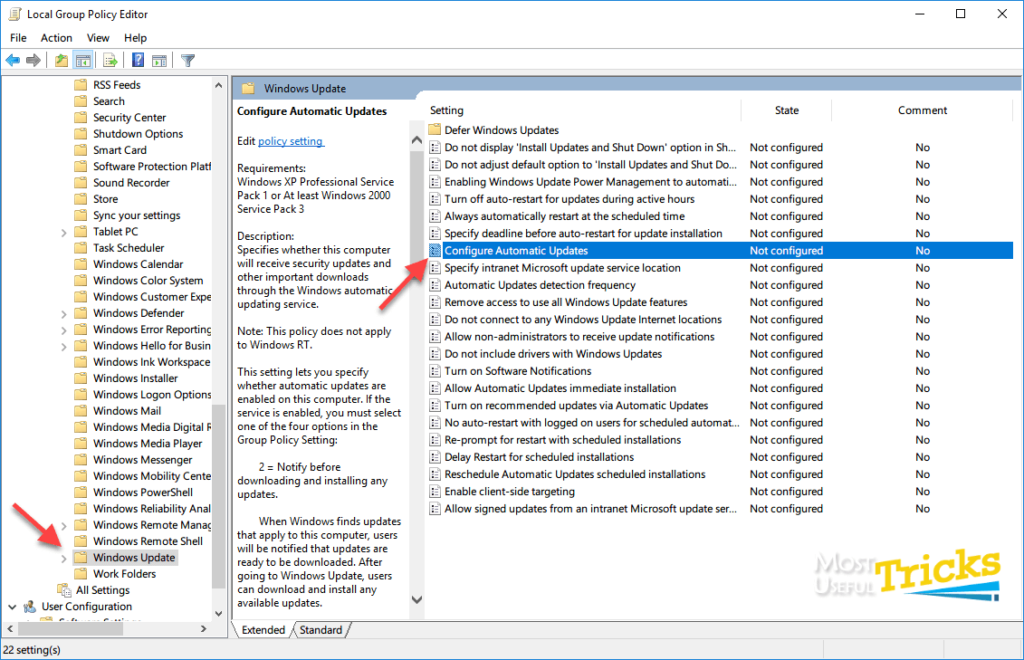
Step 1: Here you have to open Group Policy Editor first. Search for group policy in the start menu and open the first result that pops out. And, you can also use the Run dialogue box (Win key+ R) and enter gpedit.msc into it.

Step 2: You have to follow Computer Configuration > Administrative Templates > Windows Components. And, you have to choose Windows Update from the main panel given on the right side of the window.

Step 3: Now you will be led to a new window where you see many keys and folders. You should search for Configure Automatic Updates and, open it.

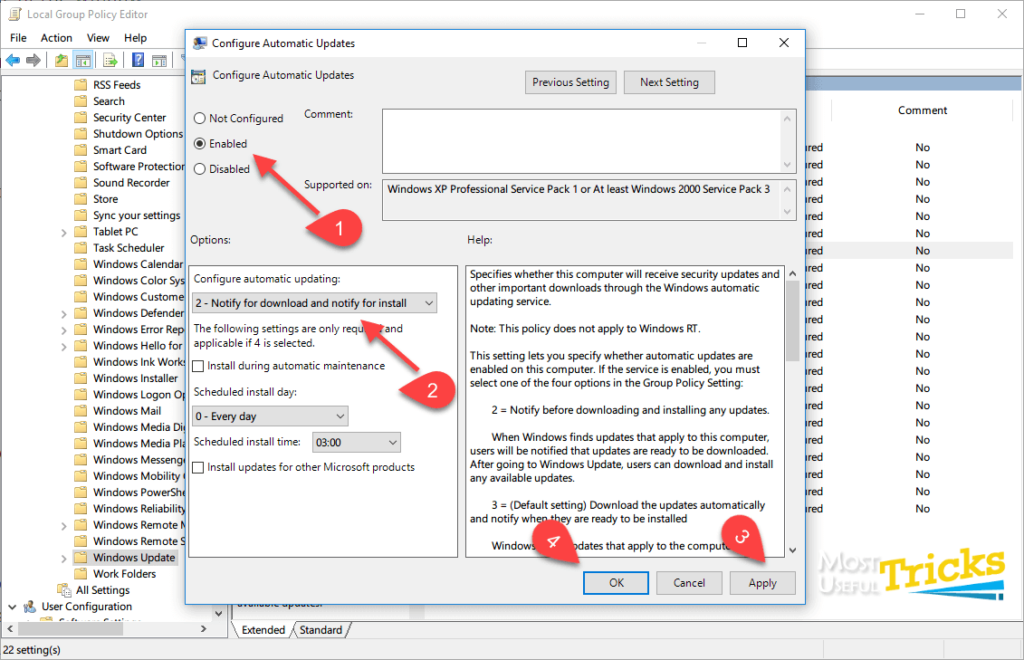
Step 4: First, you must enable the service. And, you can choose from four available options. They are;
- Notify for download and notify for install
- Auto download and notify for install
- Auto download and schedule the install
- Allow local admin to choose a setting
I guess the first option is what you need. After selecting it, hit Ok. There you go!
Conclusion
I hope you now know how to stop Windows 10 from auto-updating. In case you have any queries regarding the process, you can ask me using the comment section down below. I don’t think this topic needs further clarification. Moreover, I want you to share this post on all of your social media networks.
How is this undone ?
Hi,
Thanks Sagar for sharing such a valuable technical step by step Guide which helpful to Disabale Win 10 Auto updates….!!
You are always welcome 🙂
Thank You Sagar. I got rid from Self update of my Windows. Also I saved my storage and Data.
Welcome Bro 🙂 Even I just followed my own article after reinstalling Windows 10 on my PC yesterday.
Hope you like other guides as well.